
Key Insights on Sensors, Communication, and Factory Operations
IoT smart sensors, called Radionodes, have various and complex functions, making it sometimes difficult to understand.
To understand Radionodes, you need to grasp four things: understanding the sensors, knowledge of different communication methods, familiarity with the cloud, and understanding various industrial scenarios. Those receiving this email are part of the special group I manage, and I will continue to send useful information to ensure you have sufficient understanding.
In this month’s RADIONODE TIPS will cover the instant alarm notification feature supported by the RN17X series and the RN400-T2EX, H2EX products.
Radionode Alarm Instant Sending Function
Generally, alarms sent from Radionode365 are dispatched according to the device’s transmission interval. However, some Radionode products have a feature that allows instant alarm notifications when abnormal data is detected, regardless of the device’s transmission interval. The RN17X series and RN400-T2EX, RN400-H2EX are among these products. These devices are designed to independently detect anomalies within the device by setting a normal range for the sensor, enabling them to send an immediate alarm when abnormal data is identified. Utilizing this instant alarm feature allows for quicker and more efficient responses to deviations.
How to Set Up the RN17X Series
- Connect the RN17X device to your PC using a USB cable.
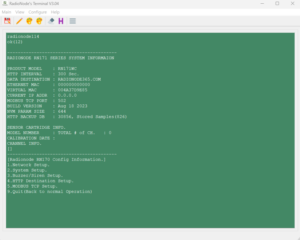
2. Open the Radionode Terminal software, and once the green appears, type “Radionode114” to begin the setup.
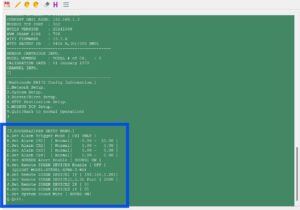
3. When the menu list appears, press the number key 3 and then Enter to access the Buzzer/Siren Setup.
4. In the Buzzer/Siren Setup menu, use Menu A to select the channel for which you want to enable instant alarms. To set an alarm only on Channel 1, press 1 to assign the alarm to CH.1.
5. Use Menus B, C, D, and E in the Buzzer/Siren Setup menu to define the normal range for each sensor from Channel 1 to Channel 4 connected to the RN17X device.
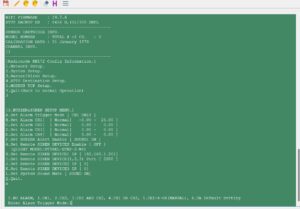
6. To set the normal range for Channel 1, press the B key and then Enter.
7. A prompt will appear to enter the minimum and maximum values for the channel’s normal range. To set the range from -8°C to 25°C, type -8, 25 and press Enter.
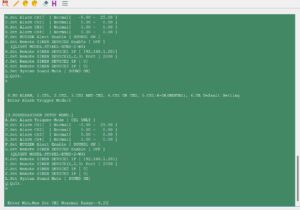
8. You will see that the normal range for Channel 1 has been successfully set to -8°C to 25°C.
9. Press Q to exit the setup.
How to Set Up the RN400 Series
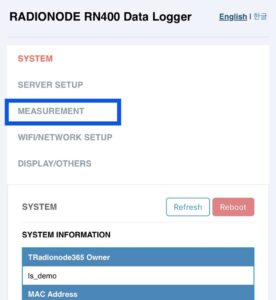
- Enter AP mode on the RN400-T2EX or RN400-H2EX.
(How to Enter AP Mode)
2. Go to the Measurement menu.
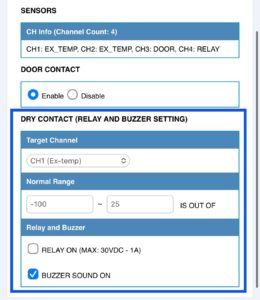
3. In the Dry Contact (Relay and Buzzer Setting) menu at the bottom, set the target channel and normal range for which you want instant alarm notifications.
4. Activate the “BUZZER SOUND ON” option in the Relay & Buzzer menu.
5. Press the REBOOT button to exit AP mode settings.
For further information on Radionode tips, or to find the ideal solution for your application-specific needs, contact a CAS Data Logger Application Specialist at (800) 956-4437 or request more information.