
Smart Data Loggers Enable Local & Remote Connection
Smart data loggers offer several convenient features, not least of which is the ability to connect to local area networks (LANs). In our latest Technical Article, CAS DataLoggers and dataTaker show you how to connect a dataTaker DT80-range intelligent logger to a LAN. It’s an easy way to enable quick data retrieval and data sharing.
Prerequisites:
- Nil
Required Equipment:
- dataTaker DT80 Range Data Logger
- Ethernet cable
- Free network port on an active wall-plate, switch, router, etc.
- PC with free USB port and DeTransfer software (static IP address only)
Process
Physical Connection:
1. Apply power to the dataTaker
2. Plug one end of the Ethernet cable into the dataTaker and the other end into a free, active Ethernet port (wall plate, router, switch or hub) so that the dataTaker is connected to the network. Ensure that both plugs ‘click’ firmly into their sockets.
3. Now that the dataTaker is plugged into the network, it needs a network (IP) address.
- If the network supports dynamic IP addressing, then you must configure the IP settings of the dataTaker manually: proceed to the “Static IP addresses” section.
- If the network doesn’t support dynamic IP addressing, then you must configure the IP settings of the dataTaker manually: proceed to the “Static IP addresses” section.
Obtaining an IP Address

Dynamic IP Addresses: If the network has assigned the logger an IP address, then it will be displayed on the “Eth IP” screen (on the dataTaker) as shown above (use the UP/DOWN arrows on the front of the logger to navigate to this screen).
NOTES:
-
- If the IP address is displayed as 0.0.0.0, then the dataTaker is still looking for an IP address.
- If the IP address instead begins with 169.254, then the data logger has assigned itself an IP, not the server. In this case a static IP address must be used.Once the logger has successfully been assigned an IP address, you will be able to browse to the dataTaker web interface using any web browser
Static IP Addresses:
To assign a static IP address, just follow these steps:
- 1. Obtain TCP/IP settings from the network administrator. You’ll need an IP address, subnet mask, gateway, and DNS server addresses.
- Plug the USB cable into the USB slave socket on the side of the dataTaker, and the other end into a PC.
- Using DeTransfer software, establish a connection to your dataTaker.
- Now enter the following commands into the command window:
PROFILE”ETHERNET””IP_ADDRESS”=”XXX.XXX.XXX.XXX”
PROFILE”ETHERNET””SUBNET_MASK”=”XXX.XXX.XXX.XXX”
PROFILE”ETHERNET””GATEWAY”=”XXX.XXX.XXX.XXX”
PROFILE”NETWORK””DNS_SERVER_1″=”XXX.XXX.XXX.XXX”
PROFILE”NETWORK””DNS_SERVER_2″=”XXX.XXX.XXX.XXX”
(Where XXX.XXX.XXX.XXX are provided by the network administrator.)
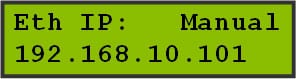
5. You’ll be able to check the IP address at any time by looking at the “Eth IP” screen on the dataTaker as shown above (use the UP/DOWN arrows to navigate to this screen).
Once you’ve successfully entered the TCP/IP settings, you’ll be able to browse to the dataTaker web interface just by typing the address into a web browser.
For more information on connecting a dataTaker DT80 Range Data Logger to a LAN, contact a CAS DataLoggers Technical Specialist at (800) 956-4437.